Tuesday, October 11, 2011

Wonton wrapper cheese ravioli

I love pasta!

This is cheesy goodness all wrapped up in a delicious ball of dough. They fit the bill for 1) tasty  2) relatively quick-making, including prep-ahead if needed 3) somewhat healthy 4) fairly impressive and suitable for guests!

Chris likes these with meat added, but I don't feel the need (in fact I find I like it better without).

  
The below serves one, but can be easily doubled or more for more servings:

For the ravioli itself, the ingredients are as follows:
- 8 wonton wrappers (find them in either the chilled produce area near bagged salads, or the refrigerated area with tofu and other vegan products; personally, the type I use from the produce section have kinder nutrition facts, a bit smaller size and definitely nicer packaging, if that's relevant)
- 1/4 cup low fat ricotta cheese
- 1/4 cup part skim mozz cheese
- about 8 leaves (or at your discretion) fresh basil. I adore basil so I use a lot, but use less if you prefer. I like to do a nice little chiffonade, as fancy as that sounds. Just stack the leaves and roll them up tightly and then thinly slice the log you've made. It makes little ribbons.
-salt and pepper to taste

First, mix the fillings well with a spoon or spatula. Add the ricotta, mozz and fresh basil together along with salt and pepper.


I find it helps to spread a wide sheet of wax paper on the kitchen counter on which to build the ravioli.

Now, your ravioli can either be 8 small triangles or 4 big squares (or something in between). The small triangles are maybe a bit prettier and more fun to eat, but the large squares are a bit easier to make and tend to break less when boiling. To be honest,  I can never make up my mind between the two so I usually end up doing 4 small triangles and 2 big squares.


Use about one eighth of the mixture for each triangle or one quarter for each square. Put the proper amount in the center of each wonton. If it's to be a triangle, moisten two edges with water, then carefully fold over the middle and press the edges together, getting rid of as much extra air as possible. If it's to be a square, moisten the edges of all sides and then lay the second wonton on top, again getting rid of the extra air while sealing as tightly as possible. You may also want to crimp the edges with a fork for a tighter seal.


When all your ravioli are made, carefully drop them into boiling water one at a time. They should be done in about 3 to 5 minutes.

I love to serve these with my Roasted Garlic Marinara, a healthy shred of fresh parmesan, olive oil on top of all of that and some freshly ground black pepper. And a leaf or two of basil for garnish if you're feeling fancy :)

The ravioli themselves are 9 P+.

Monday, September 5, 2011

Roasted Garlic Marinara

A tasty marinara sauce is a great staple to have on hand. I created this recipe because I wanted a relatively simple version that had tons of flavor without a lot of ingredients.


Ingredients:
-28 oz can crushed tomatoes
-14.5 oz can tomato sauce
-1 head of garlic
-large stalk or two of fresh basil
-1/8 tsp olive oil
-salt and pepper to taste

The most important aspect of this recipe is the roasted garlic. It adds a sweet, buttery flavor that matches well with the tomato and basil.

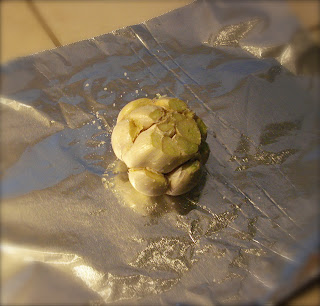
Start by preheating the oven to about 385. Some advise 400 or higher, but I find the garlic works best if it goes a little longer at a lower temperature. Peel off the outermost layers of the garlic and then chop off the top of the whole head. Be sure that each clove has its top cut off (you can do the last few individually if needed). Place the head in a square of foil, top with olive oil and a pinch of salt and then wrap the foil completely around the garlic. Roast for 45 minutes to an hour until the garlic is soft and golden in color.


When the garlic is cool enough to handle, pop the cloves out of the remaining skin and into a large saucepan. They should come out easily. Bruise the fresh basil a bit so the flavor will dispense easily, then drop the whole thing into the pan as well (stems and all).


Over medium heat, add the crushed tomatoes and tomato sauce. Let the whole thing simmer for 30-45 minutes, adding salt and pepper to taste.


After the sauce has cooked and the flavors have melded together, remove the basil and discard. If some of the leaves stay in the pot that's fine!

Give the sauce some time to cool (to avoid burning yourself if there's any splashing), then use a potato masher to smash the garlic to oblivion.

This marinara keeps well in a sealed container in the fridge and is perfect for pizza, pasta or by the occasional spoonful!

Makes about 5 cups total. Serving size is a quarter of a cup, 1 PointsPlus per serving.

Cheers!!

Friday, August 26, 2011

Garlic Cilantro Shrimp

Shrimp are a great ingredient for adding protein with very little fat and tend to be a budget friendly choice at the seafood counter. Since they're also quick-cooking, this recipe is one of my favorite dishes to prep ahead of time for a meal that I want to come together very quickly later in the week.

For the shrimp, I like to buy the ones marked "Easy Peel". They've already been cleaned and the remainder of the shell comes off with no trouble. Personally, I'm picky about my shrimp being very well deveined before I have to deal with it or eat it.

This recipe makes two servings.


Ingredients:
-1/2 lb. shrimp, cleaned and rinsed
-1/4 cup fat free chicken broth
-4 tsp olive oil (WWers note your oil serving here)
-1 clove garlic, finely chopped
-approx 2 T cilantro, finely chopped
-1 T lime juice
-1/2 tsp cajun seasoning (or more if you like a little more heat)
-1/2 tsp salt
-1/2 tsp black pepper
-additional cilantro to garnish (optional)

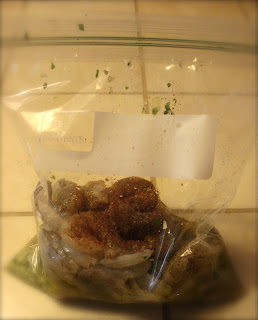
I like to just dump everything into a plastic bag (quart size is plenty big) and do the mixing in there rather than dirtying a bowl. Then it goes into the fridge to marinate until time to cook, which for me is usually a day or two later.

To cook, place the shrimp in a pan in one layer. Reserve the remaining marinade.

They don't take long to cook, probably about 2-3 minutes per side. When the edges get pink, flip the shrimp and then add the remainder of the marinade to the pan to cook as well.

Another 2-3 minutes (they should be opaque and bright pink) and your shrimp are done!

This is great served with a pasta (linguine or fettucine work well) or over grits with a little extra fresh cilantro as pictured below. I use instant grits. Be sure to use all of the sauce as it has a ton of great flavor!

5 PointsPlus per serving (plus whatever you serve it with, grits/pasta/etc.)


Cheers!

Tuesday, August 23, 2011

Out to Eat! Casa de Ramos


Chris and I both have a love for Mexican food, and who wouldn't? Cheesy, flavorful goodness wrapped up in warm tortillas bathed in spicy love. Or some variation of that.

When we first moved to Los Angeles, we started to seek out local restaurants that would help fill the voids of the places we grew up with, and of course a great Mexican restaurant was one of our top priorities. We were looking for a very specific combination of things for the experience:

-excellent chips and salsa that flow freely from the time you sit down at the table
-stellar margaritas (in both flavor and potency!)
-near to our home, preferably somewhere that wouldn't have traffic between us and it and would have (free) parking available when we got there
-diverse but not pretentious menu
-delicious food (obviously!)
-comfortable atmosphere and friendly service
-a price point that won't break the bank if we visit on a regular basis. For us coming to LA from Alabama, "cheap" is not a realistic term.

After some online research and review-hunting along with a LOT of trial and error, we stumbled upon Casa de Ramos, a small establishment in Glendale just down the street from us.

The chips and salsa were not exactly what we thought we were looking for but are extremely tasty nonetheless and plentiful to boot. The chips are heartier than the typical restaurant chips and the salsa has a smoky flavor. If you ask them for mild you'll get another similar salsa with less smokiness and heat (personally I like to mix the two for a nice balance of both).


The margaritas are light and tangy with just the right amount of sweetness and a good kick from the tequila. The serving is generous without being a fishbowl. 


We've tried a few different things from the menu but quickly fell into the habit of ordering our favorites on most trips. Chris's combo includes a taco (he chooses beef and every time proclaims "I always forget how good this beef is!"), a cheese enchilada and a tamale, served with rice and beans. ($11 for this meal)
Can we please discuss how amazing this cheese looks??!


I usually opt for the less intimidating one-item combo, a cheese enchilada along with the rice and beans, NO green onion. ($8.50)

Note the dividing line before diving into the lusciousness. Encourages a modicum of self-restraint and the joy of leftovers.
We're happy to have found "our" local Mexican place. I only wish they were open seven days a week, but alas they are closed on Sundays.

Cheers!

Baked Tortilla Chips

I talked about salsa in the last post, so obviously I had to make a note on tortilla chips. Chris and I haven't bought a bag of tortilla chips in years, not since we figured out how to make our own that are 1) cheaper and 2) healthier!

The ingredients are simple:

-corn tortillas (I use Mission brand, Extra Thin)
-cooking spray
-salt

That's it. And the process is equally simple:

Preheat oven to 400. Cut your tortillas into triangles (I like to use a pizza cutter for this). Of course, how many times you divide them depends on how big you want your chips to be. I always cut into eight chips each because I like to spread things out more. Getting 8 chips per serving seems a lot more fun than getting 6.

Give them a quick once-over with cooking spray and then lightly salt. 


Spread your chips onto a baking sheet. Be sure to tessellate!! We're going for maximum chip yield per batch!

Bake. It usually takes mine 6-8 minutes or so, but DO NOT set a timer and walk away. Watch them like a hawk. When the edges on all your chips are slightly browned, they should be done. They will continue to crisp a little after you pull them from the oven. I can't stress enough to be careful because they will go from getting close to done to blackened charcoal very quickly.

Enjoy! These save well sealed in a plastic bag at room temperature.

With the type of tortilla I use, the value works out to be 1 P+  per tortilla, but be sure to check nutrition facts on your tortillas.

Cheers!!

Saturday, August 20, 2011

Homemade Restaurant-Style Salsa

Let me admit now, upfront: I'm a picky eater. I know, being a food lover doesn't generally allow for those of us who are picky, but I've learned to adapt foods to suit my own tastes while (sometimes slowly) adapting my taste to enjoy a wider variety of foods. It's a work in progress!

If you ask me, this onion got what it deserved...
Some people naturally love vegetables. I am not one of them. For instance, like many others out there I have a strong aversion to raw tomatoes.  (Keep in mind, I could suck down ketchup by the gallon but raw is another story). However...


I love salsa!

I mean, who doesn't? Salsa is versatile, healthy and can be extremely budget friendly. If you do it right (in my opinion), the spice will kick you directly in the rear (or wherever). Also, it's EVERYWHERE. You can order salsa with pretty much anything. Simply put, salsa is HOT STUFF!! (Oh, puns. Forgive me)

I spent years eating salsa in Mexican restaurants by the bowlful without batting a veggie-intolerant eye but never found any kind of jarred or canned salsa that could come close to the same caliber of taste and texture.  I tried making my own "fresh" salsa from recipes but they weren't cutting it either. Just piles of chopped veggies which in my opinion was NOT an acceptable pairing to tortilla chips.

Finally, I found the solution. The salsa recipe that ACTUALLY tastes like the salsa I love in Mexican restaurants. After many google searches and a lot of trial and error I came across this recipe:

Winning Salsa

Who would have guessed that canned and jarred ingredients could triumph over the fresh stuff?? Apparently that makes all the difference.

Personally, I make it as follows:

- big handful of fresh cilantro (note: some people find cilantro to taste "soapy"; I have no solution for this, but I know enough to know that you can't just "get over it", so don't try to make them; let the soapy people eat guacamole or other salsa or whatever instead, just don't make them eat cilantro because that's kind of mean and not awesome)
- 28 oz can crushed tomatoes (mine are from Ralph's but I'm sure it makes no difference. Hooray Ralph's!)
- bunch of pickled jalapenos (I usually use at least a dozen), with a little of the juice thrown in for texture and flavor
- couple of pinches of garlic powder, maybe about half a teaspoon
-dash+ of salt, again maybe half a teaspoon


The first time you make it I'd recommend starting with less cilantro and jalapenos and then add to taste after the first blend.

Blend all ingredients, in a blender. Blend well. I find that the texture works best when you put the cilantro and peppers in the bottom of the blender and then let the tomatoes go in on top of that. Check for flavor and add more cilantro or peppers if you want to kick it up. The flavors will become more pronounced over time in the fridge.


Eat!

I store this in a wide mouth Tupperware. That way it keeps its freshness but is still easy to DIP from, which is extremely useful in this case. 


I use this salsa in tons of recipes. It's actually been a great way for me to more easily incorporate vegetables into my day. I'm no nutritionist, but I know that tomatoes do a lot of good things for the body.

This recipe also introduced me to fresh cilantro and it's now an ingredient I love. (See! Progress!)

Cheers!

Friday, August 19, 2011

Welcome!

Welcome fellow food enthusiasts! This blog is meant to be a place for sharing the joys and occasional pitfalls of cooking, dining, sharing meals with friends and family and everything in between.

My love affair with food has been an important part of my life for longer than I can remember. My mother (love her dearly) was not a born chef and worked full time, so I was introduced to the restaurant world early enough. However, my grandmother taught high school home economics for twenty-seven years and it was from her that I learned cooking essentials, meal planning and other tips and tricks that I still use to this day. Dining both in and out of the home are valuable and special in their own way.
Three generations :)

I am not what some might call a "food snob". I believe that any meal is what you make of it and that people find satisfaction in the most widespread of places. There is a time and place for every kind of food, whether it's a renowned Mexican restaurant like Frontera Grill, a tiny hole in the wall burrito joint in a strip mall or even the occasional 2:00 AM Taco Bell feast.

With the privilege of savoring delicious food and drink comes a responsibility to health. Over the past several years I have had great success with using Weight Watchers as a way to balance a love (sometimes lust!) for food with a healthy approach to nutrition. Many of my recipes will include information so that others using the Weight Watchers plan can more easily incorporate them into their day.

Thanks so much for joining me here, I sincerely hope you enjoy! Cheers y'all!!!

Catherine